

 24.09.2026
 38 görüntülenme
Common Professional Raster to Vector Art Problems and How to Fix Them
Converting a raster image into vector artwork can make a design more flexible for printing, branding, packaging, signage, apparel, and digital applications. However, the quality of the final vector file depends heavily on how the conversion is performed.
A poorly converted design may contain rough curves, unnecessary anchor points, incorrect colors, distorted proportions, or unwanted shapes. These problems can make the artwork difficult to edit and may also affect the final production result.
Professional raster to vector art requires more than simply running an image through an automatic tracing tool. The artwork needs to be reviewed, recreated, cleaned, and tested according to its intended use.
This guide explains common raster-to-vector problems and practical ways to fix them.
What Is Professional Raster to Vector Art?
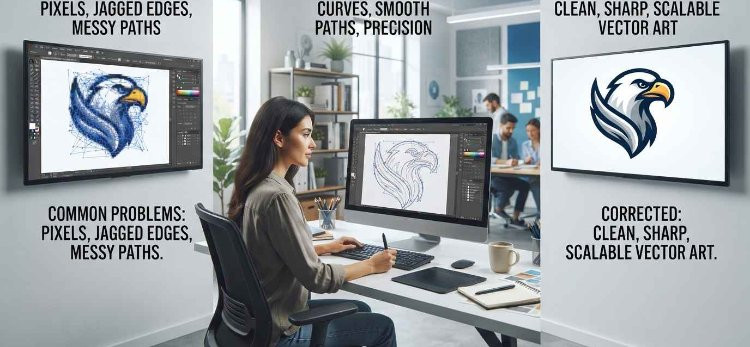
Raster images such as JPG and PNG files are made from pixels. When these images are enlarged, the pixels can become visible and produce blurry or jagged edges.
Vector artwork uses paths, anchor points, lines, and curves instead of fixed pixels. This allows vector graphics to be resized without the same type of pixelation.
Professional raster to vector conversion involves recreating the original artwork as clean vector paths while maintaining its important shapes, proportions, colors, and details.
The process may use automatic tracing tools, manual tracing, or a combination of both.
Why Do Raster to Vector Problems Happen?
Problems can occur for several reasons. The original raster image may be very small, blurry, compressed, or damaged. Automatic tracing software may also interpret pixels incorrectly.
Another common reason is insufficient manual cleanup after the initial conversion.
A vector file can have the correct file extension and still contain poor-quality paths. For professional use, the structure of the artwork matters as much as the format.
Problem 1: Too Many Anchor Points
One of the most common problems is excessive anchor points.
Automatic tracing software can create numerous points around curves and irregular edges. While this may closely follow the pixels in the original image, it often makes the vector artwork complicated and difficult to edit.
Too many points can also produce uneven curves and increase the file's complexity.
How to Fix It
Review the paths and remove unnecessary anchor points while keeping the original shape intact.
The goal is not to use the fewest possible points at any cost. Instead, anchor points should be placed where they are actually needed to control the shape.
For smooth curves, carefully positioned points and properly adjusted handles generally produce cleaner results than a large number of small points.
Problem 2: Rough or Uneven Curves
Curves are particularly noticeable in logos, circular graphics, lettering, and illustrations.
Poor tracing can create bumps, flat areas, or uneven transitions that were not present in the intended design.
How to Fix It
Inspect curved sections at a larger working scale and adjust the anchor points and handles.
For symmetrical artwork, check both sides of the shape to make sure they maintain consistent proportions. Curves should transition smoothly rather than changing direction abruptly.
Manual refinement is often necessary when automatic tracing produces rough outlines.
Problem 3: Jagged Edges
Raster images can contain jagged edges because they are made from pixels. If these edges are traced literally, the resulting vector file may contain unnecessary small changes in direction.
This can make the final artwork appear rough.
How to Fix It
Instead of following every pixel, recreate the intended shape using smooth vector paths.
For logos and clean graphic elements, the designer should focus on the actual shape rather than reproducing every irregularity visible in a low-resolution source image.
This is one reason professional manual refinement can be important.
Problem 4: Incorrect Proportions
A vector recreation may look similar to the original but still have slightly incorrect proportions.
For example, a logo symbol may become wider, a letter may become shorter, or the spacing between elements may change during tracing.
Small differences can become more noticeable when the artwork is used for branding.
How to Fix It
Compare the vector version with the original artwork throughout the conversion process.
Check the height-to-width relationship, spacing, alignment, and relative size of individual elements.
If the original design follows a specific geometric structure, use appropriate alignment and measurement tools to maintain consistency.
Problem 5: Incorrect Colors
Color conversion can also create problems.
The raster image may contain compressed or altered colors, while the vector file may use a different color mode. RGB colors used for digital screens may also appear different when prepared for print using CMYK.
How to Fix It
Identify the intended color values before finalizing the vector artwork.
For business logos, use official brand colors when available instead of simply sampling colors from a low-quality raster image.
If the artwork will be printed, confirm the required color mode and specifications with the printer or production provider.
Problem 6: Unwanted Background Elements
Raster images often contain backgrounds that are not part of the main design.
For example, a logo may be supplied as a JPG with a white background. Automatic tracing can sometimes convert that background into an additional vector shape.
How to Fix It
Identify which elements belong to the actual design and remove unnecessary background objects.
If the final artwork needs transparency, make sure the background is removed correctly and that the required vector elements remain intact.
Problem 7: Small Details Get Lost
Low-resolution images may contain small design details that are difficult to interpret.
Automatic tracing can remove these details, merge them into larger shapes, or create inaccurate versions.
How to Fix It
Review small details manually and determine whether they should be retained, simplified, or recreated.
The decision should depend on the intended application. A tiny detail that works in a large digital image may not be practical for small printing or embroidery.
Professional vectorization involves understanding the purpose of the artwork rather than copying every visible pixel.
Problem 8: Text and Fonts Look Incorrect
Typography can be challenging during raster to vector conversion.
A raster image does not contain editable font information. It only contains the visual appearance of the letters.
Automatic tracing may create irregular letter shapes or incorrectly reproduce small text.
How to Fix It
If the original font is known, the designer can use the correct font and convert the text into vector outlines when appropriate.
For custom lettering or unavailable fonts, the letters may need to be manually recreated.
Spacing, letter proportions, and alignment should also be checked against the original design.
Problem 9: Overlapping Shapes Are Incorrect
Logos and illustrations often contain shapes that overlap one another.
During conversion, these areas may become incorrectly combined or separated. This can create gaps, unexpected borders, or visual inconsistencies.
How to Fix It
Inspect overlapping elements individually and use appropriate vector operations to create the intended structure.
Depending on the design, shapes may need to be combined, subtracted, intersected, or kept as separate objects.
The final structure should remain easy to understand and edit.
Problem 10: Automatic Tracing Creates Unnecessary Objects
Automatic vectorization can sometimes create dozens or hundreds of small objects from what appears to be a simple design.
These objects may represent compression artifacts, tiny color variations, or background noise.
How to Fix It
Review the artwork in outline mode and identify objects that do not contribute to the design.
Remove unnecessary shapes and simplify the artwork while preserving important visual details.
This cleanup can make the final vector file easier to manage and edit.
Problem 11: Vector Artwork Is Difficult to Edit
A vector file should ideally be organized in a way that allows future changes.
Poorly structured artwork may contain overlapping objects, excessive clipping masks, unnecessary groups, or complicated paths.
How to Fix It
Organize the artwork logically and simplify its structure where possible.
Separate important design elements into manageable objects and remove unnecessary elements.
For professional workflows, clean file organization can save time when the artwork needs future revisions.
Problem 12: Gradient and Transparency Problems
Gradients, shadows, glows, and transparency effects can be difficult to recreate accurately as vector elements.
Some automatic tracing tools may convert these effects into many separate shapes or produce an appearance that differs from the original.
How to Fix It
Determine whether the effect needs to remain as a vector element or whether it should be recreated using an appropriate gradient or transparency setting.
The intended production method should guide this decision. Some printing processes may require simplified artwork.
Problem 13: Artwork Looks Different at Large Sizes
A vector file should be scalable, but that does not mean every conversion will look correct at every size.
If the original artwork was recreated inaccurately, problems can become more noticeable when the design is enlarged.
How to Fix It
Inspect the vector artwork at both its intended production size and larger viewing sizes.
Check curves, corners, spacing, colors, and small details.
Testing the artwork at different sizes can reveal issues that are difficult to notice at normal viewing scale.
Problem 14: Vector Artwork Is Not Suitable for the Final Production Method
A vector file may be technically correct but still require additional preparation for its final application.
For example, artwork prepared for a website is not necessarily ready for screen printing, large-format printing, or embroidery.
How to Fix It
Tell the vector designer how the artwork will be used before the conversion begins.
The requirements can vary depending on whether the design is intended for:
Digital graphics
Screen printing
Large-format printing
Packaging
Signage
Apparel
Embroidery digitizing
Knowing the final application helps determine how much detail, color information, and path refinement the artwork requires.
Problem 15: Poor Source Image Quality
A very small or blurry raster image provides limited information.
The designer cannot recover details that are completely absent from the source image simply by tracing it.
How to Fix It
Provide the highest-quality original image available.
If multiple versions exist, use the largest and clearest source. Original artwork, scanned documents, or older design files can sometimes provide useful information that is missing from a compressed web image.
When details remain unclear, a professional designer may need to reconstruct them based on the visible design and available references.
Manual Tracing vs Automatic Conversion
Automatic tracing can save time and work well for simple images. However, it should not always be treated as the final step.
Manual tracing gives the designer greater control over paths, curves, proportions, and individual elements.
For many professional projects, a combination of automatic tools and manual refinement can provide an efficient workflow. Software can generate an initial result, while the designer reviews and corrects the artwork.
The right method depends on the complexity and purpose of the design.
How to Check a Professional Vector File
Before using the final artwork, perform a quality check.
Look for smooth curves, accurate proportions, correct colors, clean typography, unwanted objects, and unnecessary anchor points.
Open the file at different zoom levels and inspect both the overall design and smaller details.
It is also useful to test the artwork in the environment where it will be used. For example, a print project should be reviewed according to the printer's specifications.
How Professional Vectorization Prevents Common Problems
A professional workflow begins with an assessment of the original image. Instead of immediately tracing everything, the designer determines the important shapes and the requirements of the final application.
The artwork is then converted using an appropriate method, followed by manual cleanup and quality control.
This approach helps reduce common issues such as excessive anchor points, inaccurate curves, incorrect colors, and unwanted objects.
Why Clean Vector Artwork Matters for Businesses
Businesses often use the same logo or graphic across multiple applications.
A clean vector master file can make it easier to create different versions for websites, printed materials, packaging, apparel, signage, and promotional products.
It can also reduce the need to recreate the same artwork every time a different size or format is required.
Maintaining a reliable vector version of important brand artwork can therefore simplify future design work.
Professional Raster to Vector Art for Better Results
Professional raster to vector art requires careful attention to both visual accuracy and technical structure.
Problems such as rough curves, excessive anchor points, incorrect colors, distorted proportions, and unwanted objects can reduce the usefulness of the final artwork. Most of these issues can be addressed through careful tracing, manual editing, path cleanup, color management, and quality checks.
The most suitable workflow depends on the original image and how the final vector artwork will be used. A simple logo may need only limited refinement, while a detailed illustration may require extensive manual reconstruction.
Conclusion
Common professional raster to vector art problems can usually be reduced through proper source-image preparation, accurate path creation, manual refinement, and final quality checks. The objective is not simply to create a vector file but to produce artwork that is clean, editable, scalable, and appropriate for its intended application.
For businesses that need reliable vector artwork from JPG, PNG, scanned, or other raster images, iDigitize can help prepare professionally converted vector files according to specific design and production requirements.
FAQs
Q1. What is the most common raster to vector problem?
Excessive anchor points, rough curves, inaccurate colors, and unwanted objects are common issues, particularly when automatic tracing is used without sufficient cleanup.
Q2. Can blurry raster images be converted into clean vectors?
Yes, but the designer may need to manually recreate unclear areas. Vectorization cannot recover information that is completely missing from the original image.
Q3. Why does automatic tracing create too many anchor points?
Automatic tracing analyzes pixel changes and may create points for small variations, noise, and compression artifacts. Manual cleanup can simplify these paths.
Q4. How can I fix rough vector curves?
Review the anchor points and adjust the curve handles. Removing unnecessary points and rebuilding complicated sections can produce smoother outlines.
Q5. Can incorrect vector colors be fixed?
Yes. Colors can be adjusted using the appropriate RGB, CMYK, Pantone, or other color specifications based on the final application.
Q6. Is manual vector tracing better for logos?
Manual tracing can provide greater control for complex logos, custom lettering, and designs where accurate shapes and proportions are important.
Yorumlar (0)
Bu gönderi için henüz bir yorum yapılmamış.
Yorum Bırakın